Table of Contents
- As an administrator, how do I install and configure an ownCloud server?
- As an administrator, how do I add a user account?
- As a user, how do I connect to the ownCloud server using a desktop or mobile client?
- As an administrator, how do I enable users to connect to the ownCloud server using the server’s IP address and port 8080?
As an administrator, how do I install and configure an ownCloud server?
You can install ownCloud manually with Docker Image, or with an appliance. The following procedure demonstrates how to manually install ownCloud on a fresh installation of Ubuntu 18.04. For more information see, ownCloud Download Server Packages.
Prerequisites and preparation
- Ensure the prerequisites are met and the required or recommended packages are installed before installing ownCloud.
Configuration: Apache and database
- Run these commands in your Terminal to configure Apache and your database.
Download and installation
Depending on your organization’s needs — number of users, storage size, and high availability level — you can choose the right edition for your organization For more information, see ownCloud Editions.
- Download the ownCloud by using the command:
cd /var/www/ wget https://download.owncloud.org/community/owncloud-10.8.0.tar.bz2 && \ tar -xjf owncloud-10.8.0.tar.bz2 && \ chown -R www-data.owncloud - Install the ownCloud by using the command:
cc maintenance:install \ --database "mysql" \ --database-name "owncloud" \ --database-user "owncloud" \ --database-pass "password" \ --admin-user "admin" \ --admin-pass "admin" - Configure ownCloud’s trusted domains by using the command:
myip=$(hostname -I|cut -f1 -d ' ') occ config:system:set trusted_domains 1 --value="$myip" - Set your background job mode to Cron by using the following command.
echo "*/15 * * * * /var/www/owncloud/occ system:cron" > /var/spool/cron/crontabs/www-data chown www-data:www-data /var/spool/cron/crontabs/www-data chmod 0600 /var/spool/cron/crontabs/www-data - Configure Caching and File Locking by using the command: ```markdown occ config:system:set memcache.local –value ‘\OC\Memcache\APCu’ occ config:system:set memcache.locking –value ‘\OC\Memcache\Redis’ occ config:system:set redis –value ‘{“host”: “127.0.0.1”, “port”: “6379”}’ –type json
 6. Configure [Log Rotation](https://linux.die.net/man/8/logrotate) by using the command:
 ```markdown
	FILE="/etc/logrotate.d/owncloud"
	sudo /bin/cat <<EOM >$FILE
	/var/www/owncloud/data/owncloud.log
        {
	  size 10M
	  rotate 12
	  copytruncate
 	 missingok
 	 compress
 	 compresscmd /bin/gzip
	}
	EOM
- Complete the installation by using the command:
cd /var/www/
chown -R www-data. owncloud
Your ownCloud is now installed. To verify if it’s ready to use, navigate to YourCloud Domain. For more information, refer Detailed ownCloud Administration Guide.
As an administrator, how do I add a user account?
The ownCloud’s default view displays basic information about all the users. To add a new user,
- Enter username and e-mail of the new user.
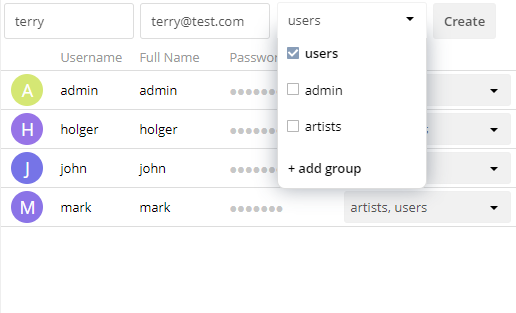
- Optional: Add group membership to the user.
- Click the Create button. The newly added user is now added to the list of users in the default view.
As a user, how do I connect to the ownCloud server by using a desktop or mobile client?
You can connect Linux, Mac OS X, Windows, and mobile devices to your ownCloud server via WebDAV. Use the ownCloud Desktop Client to keep your desktop PC synchronized with your ownCloud server. To sync your ownCloud server with Android and Apple iOS devices, use the ownCloud Mobile apps.
As an administrator, how do I enable users to connect to the ownCloud server using the server IP address and port 8080?
- Install the LDAP Integration application.
- Go to the Admin panel to configure LDAP.
- Import the Windows Server CA certificate in the pem format with .crt suffix to
/usr/local/share/ca-certificates/ - Run the following command.
update-ca-certificates - In the Server tab of LDAP, enter the following details:
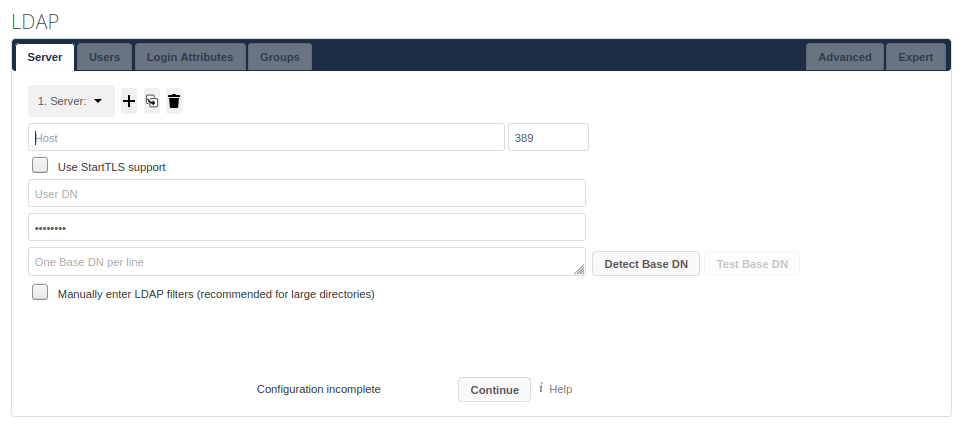
- Host: The hostname or IP address of the LDAP server.
- Port: Enter the port number 8080.
- User DN: The name as domain name of a user who has permissions to search in the LDAP directory.
- Password: The password of the mentioned user.
- Base DN: The base domain name of LDAP, from where all users and groups can be reached.